Sunday, November 23, 2014

Outfit post: The Batter-Up! daydress


So this has taken forever! I finished this dress over the summer and have worn it a whole bunch of times. I was pretty damn pleased with the results. I did a post on the making back in August (August!?!?!) and here we are, live in the in the flesh. Or fabric.


I admit that a big part of what keeps me from blogging about my finished garments is really that I have a hard time snagging a good spot to take photos. With a 5 year old in the house and my full-time job plus teaching nights I get caught up with myself and have a hard time wanting to tear myself away from sewing versus taking pictures of the dresses and outfits I so love wearing. 

I am This reminds me of my most-hated habit people have in online dating personal ads: I'm so busy I can't meet people the usual way. Ugh. You're too busy to meet people? Great. Sounds like we have a great chance at making a go of things. *sigh* 

Dear readers, whoever you might be, I promise not to make sucky excuses in future about not being able to snap a few photos. Poor snaps are better than no snaps. Done. Moving on. 


This was my first try at making a dress with a pleated skirt. Like I said at the start, super pleased with the results! I did it free-hand using inverted box pleats. The only thing that really went wrong was the alignment of the front pleats with the waist darts. Fortunately the busy print keeps anyone by me from noticing. Woo?

Outfit details:
Dress- me-made, fabric from SR Harris
Cardigan- Gap outlet, shortened by me, similar here: Kinny and Howie
Shoes- Earth Shoes Solstice
Bracelets- various spots
Necklace- Christmas gift from my stepdad a few years ago


Friday, November 21, 2014

Choosing Patterns, some how's and why's

My closet is a dense forest of me-made wardrobe items. Crammed and straining. And yet, i cannot stop myself from sewing more things to wear. I used to get sad and wistful looking into my closet, wishing I had something I was excited to wear. After I started making my own gear my closet visits transformed! Now I stand before my closet flooded with excitement about which awesome, exciting, well-fitting outfit to wear today

On the right you can my sweater bag. Cardigans in many colors and shapes, organized into warm, cool and neutral stacks. In truth, my sweater bag lives in my dude's closet. Mine, although the larger of the two bedroom closets, isn't big enough. It's love. 

So with so many fun choices how do I decide what to make next? How do I balance pattern selections? What makes a good scale, color, texture choice? Below I'll walk you through some snaps of a recent trip our to my favorite fabric warehouse! Most of my fabric choices are a variety of quilting cottons, which simplifies things a bit. I like working with quilting cottons, easy to sew, easy to care for and SO MANY CHOICES!!!


Here's a stack I had gathered up, trying to work out what I should get and what wouldn't make the cut! If you ever see that weird lady in the fabric store draping fabric over herself... think of me. I'm that lady. It's really one of the best ways to understand how a pattern will be affected by the curves of your body, whether the scale will work for you, if the color is flattering. 


This pretty light yellow-green fabric was a definite thumbs-down. Looking at my skin next to this fabric I felt super washed out. I love the scale and that the pattern offers fun possibilities for using on-grain or on-bias. Sadly, it didn't make the cut.


I struggle with feedsack patterns. I really liked this color but this particular fabric was a plaid crepe with varying levels of sheerness/opacity. I don't like to line my skirts so this one didn't make the cut either. 


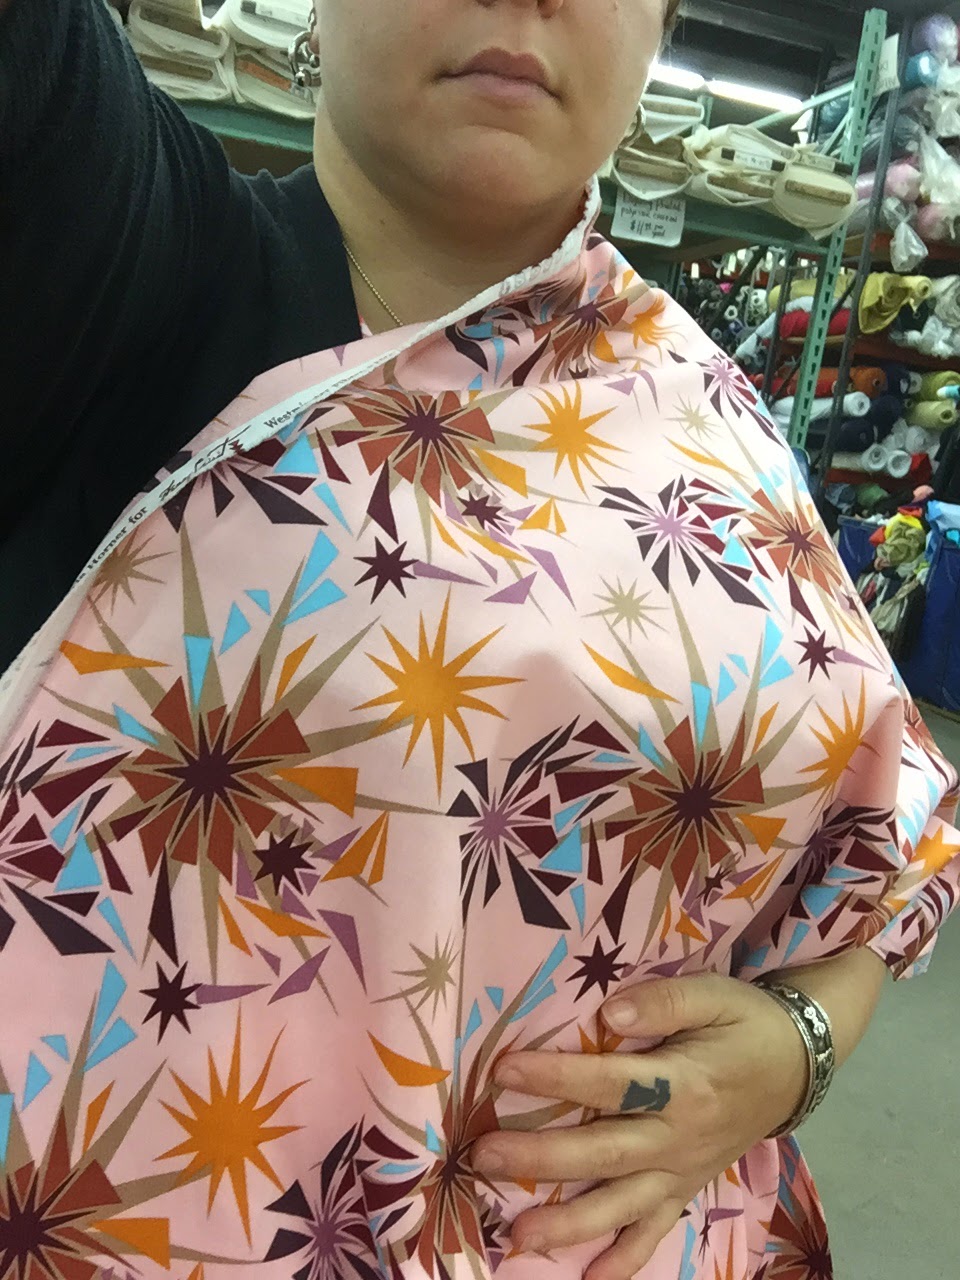
Oh man, I went back and forth on this fabric for a long time. I think I worked through the stack and came back to it 2 or three times. I so love the energy of this print, it's a little wild and fireworks-y and the shade of pink is nice and versatile. I loved the idea of the fabric in a skirt and kept imagining twirling in a circle skirt of pink fireworks... but I could not get a good image in my head with the fabric for a bodice. Who knows, perhaps next time I will see the boom boom pow pattern again. Didn't make it this time. 


At this point I am guessing you might be wondering well... what did you get? I loved this crosshatch. I like the smallness of the different elements in the pattern and how it is balanced out by the all-over, irregular cross-hatch. From a few feet away the pattern did not break into distinct boxes or stripes, also a major plus. The dots here are green, blue, white and brown. The background is pink with a darker pink crosshatch. Very flexible for cardigans. We had a winner!


You can kind of see it in my secret-excited little smirk here; I loved this fabric. It said, Barbie Throws a Party or Donna Reed's Summer Shindig or Please Wear Me With Little White Gloves!!! I brought this one home. Classic polka dots with bold pink roses breaking things up. I like irregular polka dots as I find that straight polka dot matrices make my eyes water, they look like they are vibrating. So this was a perfect solution.


Sadly, one more that did not make the cut. These are the kinds of fabrics and patterns that I really love and really wish worked for me. You can see how wan and washed out I look next to it. The pattern has a fun Deco look but I just couldn't get something that would look so blah in color next to my skin. 

I regularly make another round through the store after cutting my initial choices. First off, they ask you to reshelve your fabrics yourself. Second, I almost always feel like I will find one more thing now that I am in the zone. Here is a shot of all the lucky home-comers from the last go-around. You can see a whole bunch of things that didn't make the pictures. Some of these I felt so strongly about I didn't both with pictures for. I have finished 4 dresses from these fabrics so far. The Lemon Surprise fabric was a 2nd round find as was the chambray with discharge print roses in the upper right hand corner.  


I finally got a tripod for my camera so more outfit posts on the way! Hurray! Hopefully this helped expand your horizons of print and pattern possibilities! 

xo, 
Sarah


Thursday, October 23, 2014

Cleaning vintage jewelry and other tidbits

On a beautiful day this Autumn I stumbled across this gorgeous enamel pin tucked into the chaos of an antique mall shelf in Hopkins. It was one of those moments where you say, "Yes, I shall buy that. I know it." I could just tell by looking at it in that one glance I wanted to touch it and hold it and wear it. And it was a good price ($12) to boot!


I noticed right away that it smelled strongly of antique mall. I didn't think much of it. It had a goo weight in my hand. I loved the color and the size. I loved how different the shape was from most enamel flower pins I come across. And it's red! I love a pop of red. 

I've worn it several times now and each time my nose starts tingly after an hour or so. The smell has not abated. I have tried rinsing in plain hot water. Also with soapy water. After a suggestion from my mama I also tried a solution of mouth wash. The mouth wash helped a little and so I give that another go before eliminating it from my solutions list. So far, Google searches and forum scrolling havne't yielded anything helpful...

Knowing that issues like these just come with the territory, dear reader, here is another short list of problem remover solutions to help you out with your vintage jewelry woes...


For removing light scuffing from Bakelite, Lucite and other plastic jewelry... Brasso!

Brasso contains ammonia so be sure to use outdoors or in another, well-ventilated area. If you do a little research on restoring Bakelite you'll see that folks use all sorts of methods and products. Brasso is commonly available in your local hardware store (maybe even the grocery store!) and inexpensive. While you aren't likely to remove much patina from Bakelite with Brasso alone it is great for cleaning up the surface and improving the appearance of scuffs and smudge marks. 


For tweaking, opening, closing, fixing and monkeying... a good pair of needle nose pliers!

This happens all the time, right? You find that awesome necklace/brooch/zippered dress and you have the darnedest time getting it open and closed. One of the great things about vintage and antique goods is that it was loved before. Sometimes really loved. Clasps get yanked, zippers get caught, catches get squished. I have more than a few items that needed just a tweak from my trusty pliers to regain their life and easy of use. Having the right tools can help protect and prolong the life of your most-loved vintage and antique pieces. Just remember to treat them gently. 


For so many cleaning, primping and polishing needs... q-tips and cotton balls!

Instead of tearing off bits of toilet paper or paper towel, do yourself a favor and grab a cotton ball or a q-tip. Perhaps you are reading this and thinking, well, duh... But you know you've done it. Trying to clean something up and cutting corners because you just want to get it done and fast. One of the biggest benefits of cotton balls and q-tips is that the materials conforms to the shape of what you are cleaning. Trying to wedge a bit of towel into a crevice doesn't give you much control and it exhausts really quickly. If you are using a cleaning agent the cotton will hold and apply it evenly. Cotton is also very gentle and if you get buts stuck you can usually pull them out as the fibers stay intact, unlike paper towel or tissue that breaks apart. 

I love this storage idea! If you click on the image it will bring you to a whole slew of fun mason jar storage ideas from Hip2Save. 

I'll update you on cleaning my enamel flower. If you have any tips I would be most grateful!


Wednesday, October 8, 2014

Outfit post! Mint and peachy brights to warm a chilly morning

Hi friends! here's a quickie post on today's outfit. I am going to try to get on a track of including at least one outfit post a week. The biggest obstacle to me getting these done is that I am terrible at taking pictures of myself! Part of getting myself out of my comfort zone, though is to learn to take some good selfies. I am itching to get my hands on a smartphone-friendly tripod. Maybe one like this: 

If you will forgive me my poor selfie skills at current I promise to keep working on them! Without further ado... The Baronica dress! Our friend Barry and Monica got hitched in August and you might recall that I shared some images of this dress before, just after I finished it. 


I applie teal rick rack of differing sizes at the neck and hem and also finished the inside hem with some bright orange grosgrain ribbon which adds a fun pop of color when the hem flips up. I have been surprised how many colors pairs well with this combo and find myself rotating between shades of pink, orange, black and brown when I pair the dress with a cardigan. 

Sometime soon I'll post a step-by-step on how I have shortened my legion of cardigans to better suit the proportions of my dresses and skirts. It's super easy and makes the world your oyster of cardigan shopping! I've been bummed to find that so many cropped cardigans are acrylic and nylon based. Blech.


I'm trying to eek out a few more wears of my summer sandals. I love these Azalea's by Earth Shoe. Really supportive, comfy and aesthetically on-point for all of my favorite 40's and 50's dresses that scream, "I need brown sandals!" (Please forgive the wrinkles... I need to buy a steamer since no amount of ironing seems to banish the crinkle!)


My bracelets today are a mix of Bakelite and plastic. The three thinner bangles are each marbled in subtle ways. the top bangle is a bright orangey pink that I am working (very slowly!) to remove the patina from. I'm anxious to hear any tips anyone has!


Outfit details:
Dress- me-made, fabric from The Textile Center garage sale 
Cardigan- Gap outlet, shortened by me, similar here: Kinny and Howie
Bracelets- various spots, antique malls around the Twin Cities
Necklace- Seratonin necklace from my pal Laura when I was getting ready to move to MN

Friday, October 3, 2014

Appreciating what I have.

I wrote this almost a year ago. At the time I felt strangely about making it a public post. I still think of Roy Superior (the teacher I write about below) often. He was hilarious and determined and kind and patient and incredibly talented. He made a wonderful mark on the world. 

*****

I learned recently of the passing of one of my favorite teachers ever. I think about him nearly every time I walk into a class with my students (as it would happen, I started teaching college this year.) Although I have worked with students many times in different ways I haven’t before had the opportunity or the responsibility of standing at the front of the classroom and having it be my class. Standing on this side of the lecture and demos I realize I haven’t thanked my teachers nearly enough. Thank you, so much, for all the lessons you taught me. For the intentional, planned lessons and for the spontaneous, necessary ones. I wouldn't be here without you and I don’t want to hold back my gratitude for when you can’t receive it, either.

I realize now that I did not understand or appreciate the lengths to which you had to go just to show up, to share your knowledge let alone create meaningful lessons and experiences for us, your students. I am only just starting to have an idea. After putting many hours into writing my syllabus, creating project descriptions and outlines, timelines, requirements I find myself stymied on a weekly basis. There is always something I did not think of, something that my students ask about that I do not know and which sets us off in a new direction of information-finding. It is exhausting.

I am with my student two nights a week after my day job as a fabric engineer. Before classes I am pulling information, images, creating lectures and presentations. After classes I am meeting with students and working through issues scholastic, academic and personal. I start my days around 5am and often don’t find myself home again until 11pm. It is hard. It is exhausting … And I am so in love with it. 

I like my day job. I love working in textiles and apparel. I am excited and tickled every time I see something I worked on in a store or on a kid at the playground. I am psyched to be able to buy the things I have helped to make for my own family and to have phone conversations with friends and family far away while also having them see and touch the things I have worked on where they are, too. This is all very cool. Teaching is cooler.

One of my grad school professors proudly hangs a sign above her office door that says, “Do what you love.” I like my day job. I love teaching. Thank you to each of you who helped me get where I am. Thank you for putting in the hours and the work, dealing with the tears (for I am quite generous with them) and the resistance. Thank you for putting up with each and every one of your students on the good days and the bad. A moment of pure selfishness: thank you for putting up with all of it so that I could personally benefit from your presence in my life. Because you kept coming back, I benefited. I think I was grateful in the moment, sitting with you in an office, at a table, a desk, a computer, a loom, a workbench… Now I understand better. Thank you, thank you, thank you.


So many times, thank you. 

Thursday, October 2, 2014

Rock Vintage and Retro Shoes Even With Bum Feet

Let me start out with a big 'ol **DISCLAIMER** that I am no doctor. I have no medical training. 
I am NOT recommending any courses of treatment. 
I am only sharing my own experiences and hoping that you might benefit. 

So, about a year ago I was diagnosed with plantar fasciitis and a heel spur. Woo! Party time! Not at all. The pain in the beginning was crazy. I talk about it very briefly here and here.

IN THE BEGINNING...
I was wooed into buying things just because they were comfortable. 

The pain in the beginning was seriously so bad I cried. Please, friends, if you find you have pain in your body, don't just ignore it. So. Birkenstock clogs. I was looking for something stylish, work-appropriate and comfortable. The salesman at a local Birkenstock rep told me that everyone who tried these on loved them but they (the shoes) were just a little too small...

I wear a size 37 in Euro sizing. 7 in USA sizing. And he was right. They felt sooooo good. I felt like I needed to change my look to wear them, though. And these days they only get worn around the house or doing errands on days that I don't want to put any effort into my appearance. In short, almost never.

THEN I GOT SUCKED IN BY GLOWING USER REVIEWS...
People exclaiming that some shoe was the best thing since sliced bread. 


I missed ballet flats. I have never accepted that having Plantar Fasciitis means an end to my love of ballet flats. One of my co-workers extoled the virtues of FitFlops. So I looked into them. Major controversy on whether they really work. I ordered these for a steal on Zappos but you can also find them here. For me, ultimately, these shoes don't work. My foot works too hard trying to keep them on and I find the toe clenching causes more pain. I keep them around for dressy occasions that don't involve a lot of walking or dancing. They are still patent leather...

AND THEN... I HAD A BETTER IDEA OF WHAT TO LOOK FOR!
Now I have some reliable brands that look good, feel good and fit my vintage and retro style. 
  
One of the first shoes that I found that hit the trifecta of comfortable, supportive and vintage-appropriate was from the Worishofer brand. This particular style is the Krista. I was able to find it on Zappos but one of the best selections I've seen of the brand is from this fun bite of little, old, Floridian lady culture: Buddy Shoes of Boca Raton

Check them out! They are full of adorable, vintage-appropriate shoes that also joyously scream, "I'm going to be a fashionable old lady!


These were some of the cutest retro wedges I have found with arch support. I got them at Schuler Shoes when they went on sale. I love them so much and I am super bummed to have set them aside for the winter... *sad face* They are from Earth Shoes! You can still find them here.


I found this style of Birkenstock going down the retro shoe rabbit hole some drippy evening. Once I found out they exist I became obsessed with trying them on. Unfortunately, most retailers don't stock Birkenstock shoes. I ended up having them shipped from a store in Virginia and man! So glad I did. They are called the Perugia. I would link a store but they were a serious investigation to track down. So a Google search for you!


These Earth Shoe Solars are my go-to, closed-toe shoe. They have simple design details and feel very secure whenever I wear them. The negative heel design provides lots of comfort and the instep strap is super easy to pull on and off. These were my first success in getting close to my basic ballet flat. 


Lastly, the shoes so nice I had to buy them twice! My Birkenstock Messina's always get compliments. Most folks have never seen a Birkenstock in a Mary Jane style. I found them in black at first and then spotted the brown ones on sale at... you guessed it! Schulers! They pretty much work with everything. Although they are a bit on the clunky/chunky side they are super comfortable and quite cute!

In conclusion:
-Plantar Fasciitis is not a shoe death sentence
-trial and error is essential to finding real footwear solutions to chronic foot pain
-brands covered here: Earth Shoes, FitFlop, Birkenstock, Worishofer
-additional brands worth a look! Taryn Rose, Chaco, Dromedaris

Good luck my vintage pals! It gets better!
xo, 
Sarah

Saturday, September 27, 2014

hair today, gone tomorrow

I have a roller coaster love affair with my hair. I want it pixie short, I want it Marilyn long. I want spikes, spit curls, bouffants, flips and poodle cuts. I want the Italian Cut. I want a mohawk. it is one of the most fabulous things about having short hair; I can do just about anything with a little patience between cuts.

As a little kid I have pretty straight hair. Blond. Bangs. I did not retain any of these things as I grew up, thank goodness! While blond, straight hair is certainly a lovely thing it wouldn't be great with the shape of my noggin or my coloring.

So, back to present-ish day. I had been growing my hair out into a retro bob to suit my clothing styles. But was starting to drive me mad. Here are a few shots from right before the chop!

The de-rigeur pre-cut bathroom selfie.
After a long day of travel from MN to MA... A little poofy but feeling good.
Since the majority driving reason for my curly poof was to have my hair match my clothes I decided I'd had enough. I wanted hair that was a little cuter, edgier. Less drying time. Cause really, I live in Minnesota and there is nothing like leaving the house to scrape the car in the dead of winter and realizing that whatever effort I had put into my hair was ruined by freeing instantly on stepping into -19 degree temps.

Annnnnnnd here's the new/old me! Short, pixie, spit curls and all. 


Here's my short list of how to take care of fine, curly hair:
1.) Keep it shoulder length or above.
      Longer than shoulder length starts weighing the hair down and making curl hard to control
2.) Condition with a light weight conditioner each time you wash it
3.) Use a minimal amount of product and try to mix up which product you use each day.
      I tend to cycle through 2-3 products at any given time. While my hair is very short I like
      pomade waxes, Lush's Dirty creme product, light leave-in conditioner or Aveda's curl creme.
4.) Let hair air dry whenever possible

Here are a couple more shots of pixie and other length styles I've rocked in the past couple of years. I really loved having pink hair but grew tired of the maintenance and, if you can believe it, getting touched by little old ladies and other folks in public. I dread to think of what will happen if I ever get pregnant...


To wrap things up I thought I would also share a few snaps of various hairstyles I've rocked in the years since I have moved to Minneapolis (just 3 years and so many styles of hair!) You'll also see that I am quite fond of making silly faces. I hope your enjoy them, too. 

The beginning of my mohawk and rockin' some dino earrings. Miss J likes to tell me that they are Apatasauri.
In full mohawk-y glory, getting ready for a holiday work party. I made the props for the photobooth that night.  

Sitting in the salon right before I asked my hairdresser to cut off the mop of curls I'd asked he to help me grow for six months... I love that my hairdresser gets pumped even when I ask her to change my style as soon as I've hit my last goal!


Monday, September 22, 2014

Hoppity Hop, snatched from Dolly Clackett

I was reading over on Dolly Clackett today about the blog writers blog hop and decided to throw myself in the ring. (She called it the cowards way out but I take it as a chance to dive in!)

If you are not familiar with Roisin's blog she's a delightfully funny lady in the UK who makes all manner of well-fitting novelty and bold printed dresses. I envy her shoe collection and have a crush on her geographic location (who wouldn't when a trip to Paris doesn't mean a small loan from the bank?! Except for the fabric I'd be hauling back...)

Anywho. Here I go taking up the gently set down torch:
1.) Why do I write?
Oh the lameness but it’s pretty basic. I like it and I think I am pretty good at it. I know I need to work to get my voice to come out in my blog the way it does when I write articles, cover letters and that sort of thing. But the short answer really is that I like it.

Why I write a blog is a little different. I have pretty strong feelings about personal history and leaving a mark. I’ve never had any interest in fame or renown but I do want my kids or future generations to have something they can look back on. I created my grad school thesis on the idea of memory as a tangible thing. It’s why I love vintage and antiques and thrift. Tiny, handmade poodle skirts made for some lucky kiddo. It’s all got history.

I just about gave up the ghost when I saw these. Right on the heels of, "How adorable?!"
I thought, "What a sweet gesture to make these for a kid you love..."

2.) What am I working on now?
Right now I’m actually working on planning some future blog entries on Fall/Winter sewing, working up the gumption to do some photos in my many dresses and also a modified Gertie’s Portrait blouse pattern that I’ve redrafted as a kimono-sleeved dress bodice. The new dress is cut from a hot pink waxed cotton I picked up on my summer trip home to Philadelphia. 

Here you can see that #jacknamedcat is also excited about the possibilities.
3.) How does my blog differ from other sewing blogs?
I don’t really know how to draft patterns but I do it anyway. I don’t follow many rules like pre-washing my fabrics or documenting the making process very thoroughly. But I freaking love sewing my own clothes. I completely lose myself when I sew. Hours gone by without feeling it. It takes me out of myself. Since I moved in with my Dude he’s actually given me a bunch of ideas for blog posts. I get going talking about something and he’ll inject a, “THAT’s what you write about!” He sees what sewing does for me and can draw out all sorts of observations that I have a hard time stepping back and seeing myself.

My fabulously stylish Dude and I at a friend's wedding this summer.
Such a hottie!

How does my writing process work?
In front of the TV, on lunch at work, notes in my phone… I’ve just started creating outline blog posts to keep track of various ideas. When I think about whether I want to write something down I think about whether I would want to read it. Is it worth the time writing it out? Would I want to be able to find someone blogging about something like this? Don’t I wish I could have found this info without having to slash up a pile of fabric and snarls of thread and… so forth and so on. 

Some posts brew away a long while, weeks even, before I think they are worth posting up.

I hope this was one of those thing! The enjoyable, glad I found it kind. Coming soon... thoughts on Fall/Winter sewing plans, re-evaluating my closet and how to stay warm this winter!

xo, 
Sarah

Saturday, September 20, 2014

Burgeoning Bakelite bonanza

Like so many vintage-loving ladies (and gents!) I have a major heart-on for Bakelite. My collection has grown hugely this year and I thought it would be fun to share a few of the things I have found and the many ways I have seen Bakelite lovers store their stashes. 


My most recent finds are the unworn stacks in the upper left and lower right corners. This summer I discovered a vintage jewelry store called Ann & Jack's Vintage Jewelry in Hopkins (just west of Minneapolis) that has a great variety of vintage jewelry offerings. I brought little miss J last time and was so impressed with their store. They have a chest of treasures that your little ones can paw through and take a treat home for free! What a great way to help a mama out as she gets her oooh-sparkly fix!

Anywho, the most recent acquisitions are somewhat of a work in progress. The bangles in the lower right corner have some serious patina that I believe is hiding a light blue green (top) and a hot pink (middle). The bottom one might even have some strong blue streaks if I can get the layers worked down.

I am interested in learning more about how to restore the original colors and started off with Brasso. I'll also be looking to try Novus #3 and Turtlewax Chrome polish. I've heard good things. I'd love to hear if you have other suggestions!

When you start having a good sized collection you need to find a good way to keep all those beauties stored and displayed, too! 

On my Pinterest board Bangles, brooches and bags, oh my! I have saved lots of items that just make me go, "Ooooooooh...!" I've also started saving images of the different ways people store their bangles for your viewing pleasure. Here are a couple of my favorites!


I started out with this sweet jewelry box my mother gave me years ago. It has a nice, deep bottom compartment that worked really well! You can see here, though that my collection was already bursting at the seams. Time to start looking for other, inspiring ideas!

This coke-bottle options is super neat. What a fun way to sort and store your bangles! Plus, don't you just envy a collection so broad, varied and extensive??? *sigh*

I like this idea a lot, too. A great, inexpensive way to store and display. Plus, moving your bangles off of your dresser or vanity is great for freeing up surface area! In this bangle-fan's blog she mentions the benefit of being able to swap out towel tubes when they get exhausted. I think that's pretty good but I know it would drive me batty to have to replace them and also to have to take the tube off every time I wanted to sort through the bangles. Which is why...

This is the method I love most! These bangles are not my own collection but are the same sort of storage I use. I have been extremely lucky to find a couple of these boxes at different flea markets. I have a silvery blue one that I snagged for $7 and a salmony pink one I scored for just $2! It was super dirty but has cleaned up rather well and I have been happy with it so far. 

I feel like I have seen and known about Bakelite all my life. All throughout my childhood I remember being dragged (hey, I wasn't always jazzed but I am so glad my parents made me do things that interested them, too) to flea markets all over the region. We went to antique stores in New York, Pennsylvania, New Jersey. For several years in high school we hit up the Atlantique City Antique Show. It's a mega-huge gathering of small and big time dealers all gather under one roof. 

I remember seeing cases and cases stacked with Bakelite. Bangles, jewelry, phones, knives, etc, etc. These days, every Bakelite bauble I see is that much more precious and exciting to spot. I'd love to see shots of your own bangle storage and favorite bakelite pieces! Plus, I'm excited to share updates on the restoration process of my new bangles on Instagram. 

xo, 
Sarah


Friday, September 12, 2014

Today's post is brought to you by coffee. Spilled on me leaving the house.

Laziness and a lack of knowledge ruin wardrobes. It's true. I'm sure that when lots of us get an oil stain or some such thing on ourselves we think, "Well, there goes that dress/shirt/skirt/whatever." Particularly with t-shirts. It just never seems worth pursuing an alternative... or does it? When you rock vintage, me-made or otherwise investment garments you need to know your way around a stain remover.

Today I'm gonna share a few of my most favorite solutions to those wardrobe-destroying woes. All thanks to my mama, really.

I grew up with an amazing mom who just knew how to do... anything. Install a toilet? Make a perfect Christmas cookie? Sew a shirt? Yup. Remove a stain? Absolutely. She would re-attach buttons, shorten pants and fix busted seams. I thought it was normal. I wanted to be just like her. I keep these things in my cleaning closet just for those occasions when life, you know, just seems to happen.


#1 Carbona Stain Devils
I remember picking these up in the super market when we ran out of some formula. I don't remember which ones we kept around. I just knew that there were special formulas depending on what your stain was made of. In grad school I understood much better the chemistry behind these and what a miracle they really are. In my house as a grownup I keep the Fat & Cooking Oil formula as well as the Wine, Tea, Coffee and Juice formula.
You can order them online or find them at your local Jo-Ann's.


OxiClean Versatile Stain Remover Powder Large Image
#2 OxiClean
I hardly think there's a person in US who hasn't heard of this one. But, what you might not think of with OxiClean is that it is wonderful for removing age spots and marks from vintage fabrics and linens. Whenever my mom (who now runs an antiques shop) or I come across linens that look well taken care of but no less dingy and needing a little love, we use this. A recent batch of vintage homespun napkins came home with me covered in spots and emerged from oxiclean soaking to be a clean, even cream color. As they should! Remember to run anything you've soaked through the regular wash, too.


#3 Synthrapol Detergent
Looks boring and bland, right? Wrong! While I would use Carbona for known stains and OxiClean for less known stains I use Synthrapol for all sorts of fabric cleansing. When clothes are very dirty, have sweat stains, keep shedding dye (like when you buy an indigo-dyed fabric), Synthrapol is my go-to. I started using this in college during my Fibers classes to rinse hand-dyed textiles. It's safe for home use and super efficient. A very small amount go a long, long way! I'll soak the family tablecloth in this after a holiday and have an easy-peasy time getting the marks out. It's gentle on fibers and tough on stains. Also, it has no added colors or fragrances!

All three products are pretty affordable and findable. I've included links in the title bits of each for your easy reference. Keep these ideas in your back pocket (or laundry closet!). It sure helps to know there's hope for your "ruined" clothes when you are livin' la via me-made!

xo
Sarah